

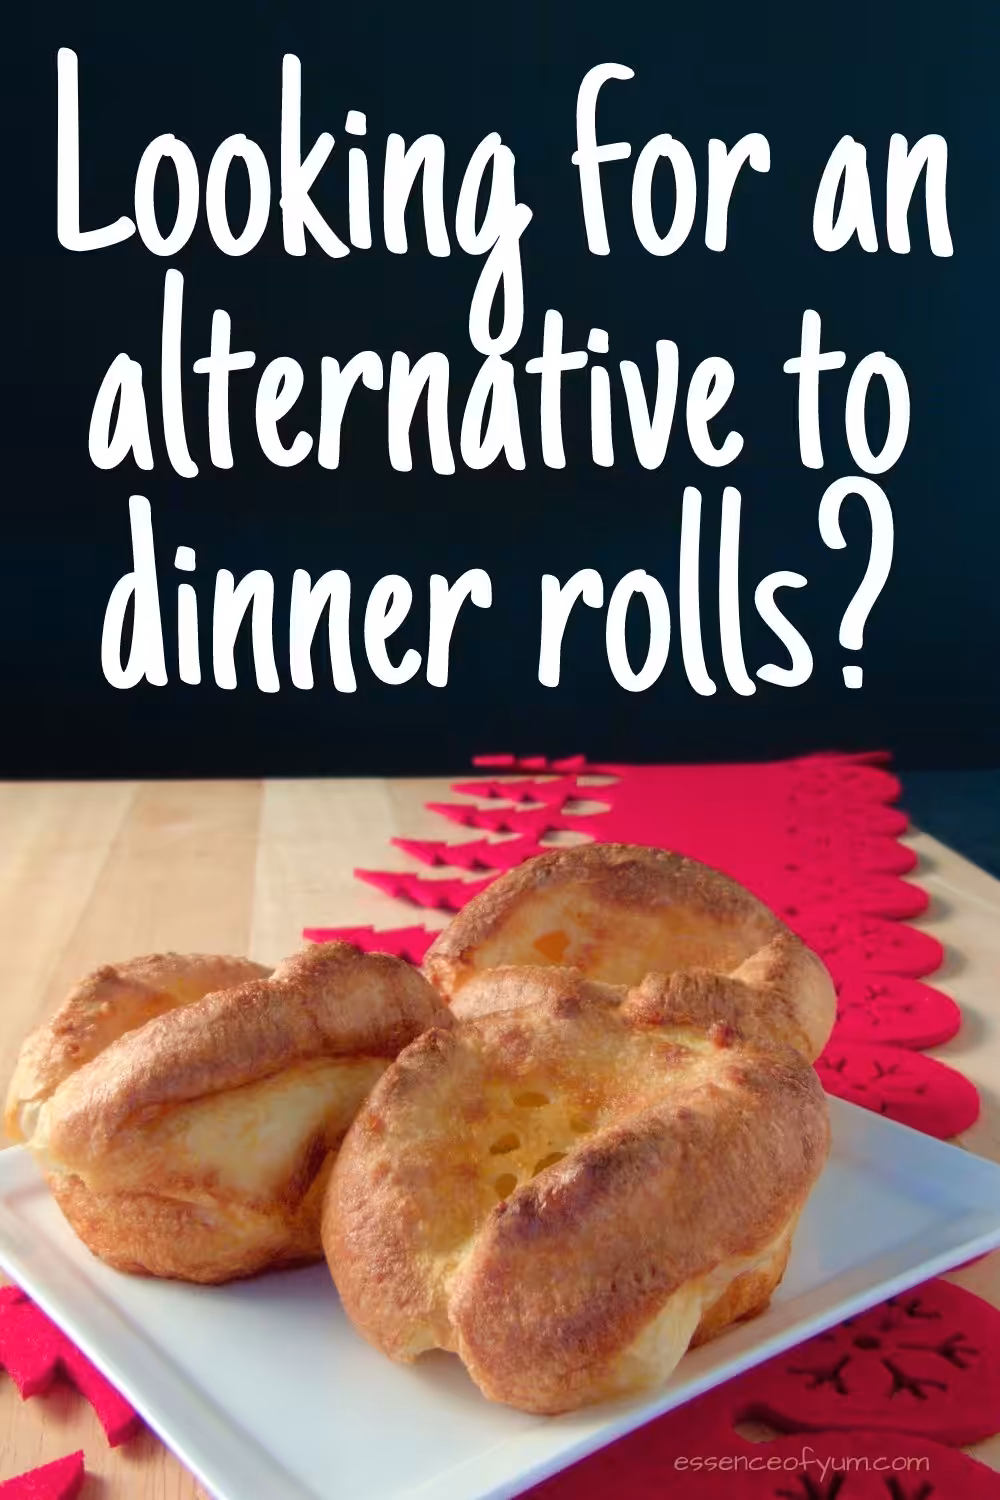
It’s just not a proper Sunday roast without Yorkshire puddings on the side. But there’s more to getting them right than you think.
Yorkshire pudding recipes are akin to those for pumpkin pie – handed down across generations, never to be meddled with. And for a very simple dish, the recipes are full of more “must-dos” and “never-evers” than anything I’ve explored so far. And many of them are different or even conflicting rules.
A big part of the reason for this variation is that, like anything, the “perfect” Yorkshire pudding is subjective. It’s “perfect” for the author, but different people like their Yorkies different ways. Some like them very fluffy, while others like them a bit stodgier. Many like them as open cups, with a hole to catch gravy, while others prefer a towering, crispy-topped pudding.
As an example, Chloe from Feast Glorious Feast has a clear view of what she prefers a Yorkshire pud to be like:
“There has been a trend in recent years, especially in pubs and restaurants to start making Yorkies with so many eggs that they puff up four or five times larger than their tin…..I don’t want a Yorkshire that cuts the inside of my mouth, doesn’t taste of anything and that I can’t fill with a little meat and gravy. Yorkshires should be soft with a little bit of crispy and golden brown with a hole in the middle. And thats that!”
This post may contain affiliate links. Please read my disclosure policy.
Making sense of it all
So there are lots of different views of a perfect Yorkshire pudding, and lots of different recipes to suit. But this makes it hard to decide which is the best approach, or recipe, to go with. So to help make sense of it all, I’ve compared twenty recipes for this famous British side dish and figured out what’s consistent, and what’s unique.
Before we dig into that though, you may be wondering – what is a Yorkshire pudding?
What is a Yorkshire pudding?
If you haven’t come across them before, Yorkshire puddings are a baked savoury pudding eaten as a side dish with roast meats, particularly beef, and gravy.
The earliest records of Yorkshire puddings date to the eighteenth century. They were called dripping puddings, and came about to catch the rich drippings from spit-roasted meat. With meat being so expensive at the time, people could not afford to waste the energy-dense drippings. It’s believed that they were also used as a starter when having guests or workers over so they’d fill up on the inexpensive puddings, and therefore eat less of the pricey meat!
Is it the same as a popover?
American popovers are remarkably similar to Yorkshire puddings. Their ingredients and their cooking methods are almost identical.
The biggest difference is a result of how they’re eaten. Yorkshire puddings are traditionally eaten as a side dish with an intensely savoury meal, usually roast beef. Popovers are mainly eaten as a sweet treat, with honey, maple syrup or jam/jelly. Because of this, you’d never make popovers with beef drippings. They’re typically made with melted butter or sometimes vegetable oil.
Heat, and the 5 keys to Yorkshire puddings that rise
For a Yorkie to rise successfully the water in the batter needs to be quickly heated to the point that it becomes steam. There are several things you can do to make sure this happens:
- Thoroughly heat your oven to 425°F or higher (220°C), giving it at least half an hour. This way the entire oven reaches the right temperature, so it will lose less heat when you open the door.
- Don’t skimp on the fat or oil. A teaspoon per muffin hole is a good amount. If you use too little oil, the pudding batter will cool the oil significantly. If it cools too much, it won’t be able to produce steam in the batter until it’s had a chance to heat back up. This is a recipe not only for puddings that don’t rise, but also for oily Yorkshires.
- Thoroughly heat the fat in the pan before adding the batter. The fat needs to be very hot, so make sure you allow it at least five minutes in the oven before adding the batter. Ideally you want it almost smoking.
- Work quickly (but carefully!) when adding the batter. Ideally, you should pour the batter in to the muffin holes without removing the tray from the oven. Slide the tray out, pour the batter quickly into the holes, slide it back in and close it up. This way the fat and the oven won’t cool down too much. If you need to remove the tray from the oven, close the oven after removing it, fill the holes quickly and return it to the oven immediately.
- Leave the oven door closed. This one’s probably the least important, but repeatedly opening the oven will lower the temperature inside, especially if your oven doesn’t recover quickly.
Paying attention to these five steps greatly increases your chances of a perfect Yorkie. Read on to learn why, and to see the results of my experiments with batter temperature and the amount of fat in the pan.
Yorkshire pudding batter
The batter is remarkably simple in terms of its ingredients – eggs, milk, flour and a little bit of salt.
Milk
Milk gives the batter moisture and flavour, but also adds to the structure thanks to its proteins.
While the authors overwhelmingly prefer whole/full-cream milk, several recommend skim or light milk (or replacing a small amount of the whole milk with water to achieve the same effect). The belief behind this is that lowering the fat content of the batter not only helps the puddings rise higher and crispier, it also gives them a softer texture. That said, only five authors take this approach.
One author, Michele from West via Midwest, goes in the opposite direction and uses half-and-half instead of milk. If you haven’t come across it before, half-and-half is a premade blend of milk and heavy cream, giving it about 12% milk fat (compared with about 3% for whole milk). It’s uncommon outside the US, but can be made at home by mixing equal parts milk and heavy cream.
Eggs
It wouldn’t be a pudding without eggs. Most of the authors specify large eggs, but several don’t specify a size at all.
Flour
Flour is the foundation of the pudding, giving it structure and texture.
Given how dramatically Yorkshire puddings rise, it’s understandable to think they’d be better made with self-raising/self-rising flour, or by adding some baking powder to plain/all-purpose flour. But this is not the case. Every recipe here uses plain/all-purpose flour, and no baking powder or baking soda. This is because the leavening agent in Yorkshire puddings is steam.
If you’re still tempted, a couple of authors comment on how they’ve tried self-rising flour, hoping for even taller puddings, and ended up with the opposite – flatter puddings. I did a bit of research on this and found many people sharing the same experience. I couldn’t find an explanation as to why, but it seems clear – skip the SR flour.
How much batter?
The recipes vary, but on average they come in just shy of three cups of batter in total. And for reference, most of the recipes are for use in a twelve-hole muffin pan.
How much of each ingredient?
You’ll often hear it said that baking is a science, full of precise measurements and exact temperatures. I’m going to dig into that just a little now, but feel free to jump down to the next section if you just want to know how to mix your batter.
Ratios
Two of the most important aspects of a Yorkshire pudding batter are:
- the ratio, by volume, of wet ingredients (milk and eggs) to dry (flour).
- the proportion of the batter that is egg.
These ratios impact the texture of the pudding, how much it rises, and more.
There’s a lot of variation in the ratio of wet-to-dry across these recipes. Using rough averages, they range from equal parts liquid and flour, to 2.3 times as much liquid as flour. Similarly, the “egginess”, measured by how much of the total batter is egg, varies from eggs only being 16% of the batter, to as much as 38%.
The interesting part about this is that although a number of authors, and their readers, insist there is science in the measurements and ratios behind a perfect Yorkshire pudding, these figures again prove one important fact. Everyone’s ideal Yorkshire pudding is different to everyone else’s.
This doesn’t help us decide how to choose a recipe though! On average, the most popular ratio of liquids to flour is 1.75 times as much liquid as flour. And just over half of the batters are about one-third egg.
This is all a bit confusing though. Fortunately there is a simpler approach you can try.
Equal parts batter for Yorkshire puddings
One approach that’s sometimes touted is the use of equal quantities (by volume) of milk, flour and beaten egg. It’s known as the equal parts method, and sometimes as the one cup method.
The wonderful thing about the equal parts approach is that you can scale your batter very easily. This is particularly useful if you want to make a smaller batch (Yorkshire pud for one?), or if you’ve only got one or two eggs. It also makes it easier to allow for really large or really small eggs.
On average, one large egg equates to roughly a quarter of a cup in volume. So using the equal parts method, you can scale your batter to match how many eggs you have:
- For one egg, you’ll need about a quarter-cup each of milk and flour.
- For two eggs, you’ll need about half a cup of each. This will make roughly a half-batch (compared with a typical recipe).
- For three eggs…you get the idea.
As I mentioned above, this approach is sometimes known as the one cup method. This is because a very common use of the equal parts batter is one cup of flour, one cup of milk and one cup of beaten eggs (about four eggs). This produces a full batch, suited to a 12-hole muffin pan as per a number of the recipes here.
And several of the recipes are very close to the equal parts formula. This will give you a liquid to flour ratio of 2:1, which is a bit higher than the average here, but interestingly Kenji recommends it as a bare minimum in his Yorkshire pudding analysis on Serious Eats.
If you’re looking to go without a recipe, the equal parts approach is a helpful guide. I’ve used this approach for toad-in-the-hole (sausages baked in Yorkshire pudding batter) a number of times and had great results.
So, what does it all mean?
The best advice I can offer from all of these ratios and numbers is this. All of these authors find success with their particular approach, but there are a few recipes that are “outliers” in the sense that their ratios are significantly higher or lower than the average. If you’re looking for the most popular approach, these outliers probably aren’t the ones to try. But if you’ve done Yorkshire puddings before and you’re looking to change it up, the outliers may offer exactly what you’re after.
Mixing the batter
The authors are split on whether you should hand whisk the batter, or use an electric mixer. Some are adamant you need to use an electric whisk or mixer until you have bubbles bursting on the surface of your batter. Others simply fully mix the ingredients by hand.
Either way, the target consistency of the batter is to be easily pourable. Some authors describe the consistency as that of heavy/double cream. Others say it will be thin and barely coat the back of a spoon.
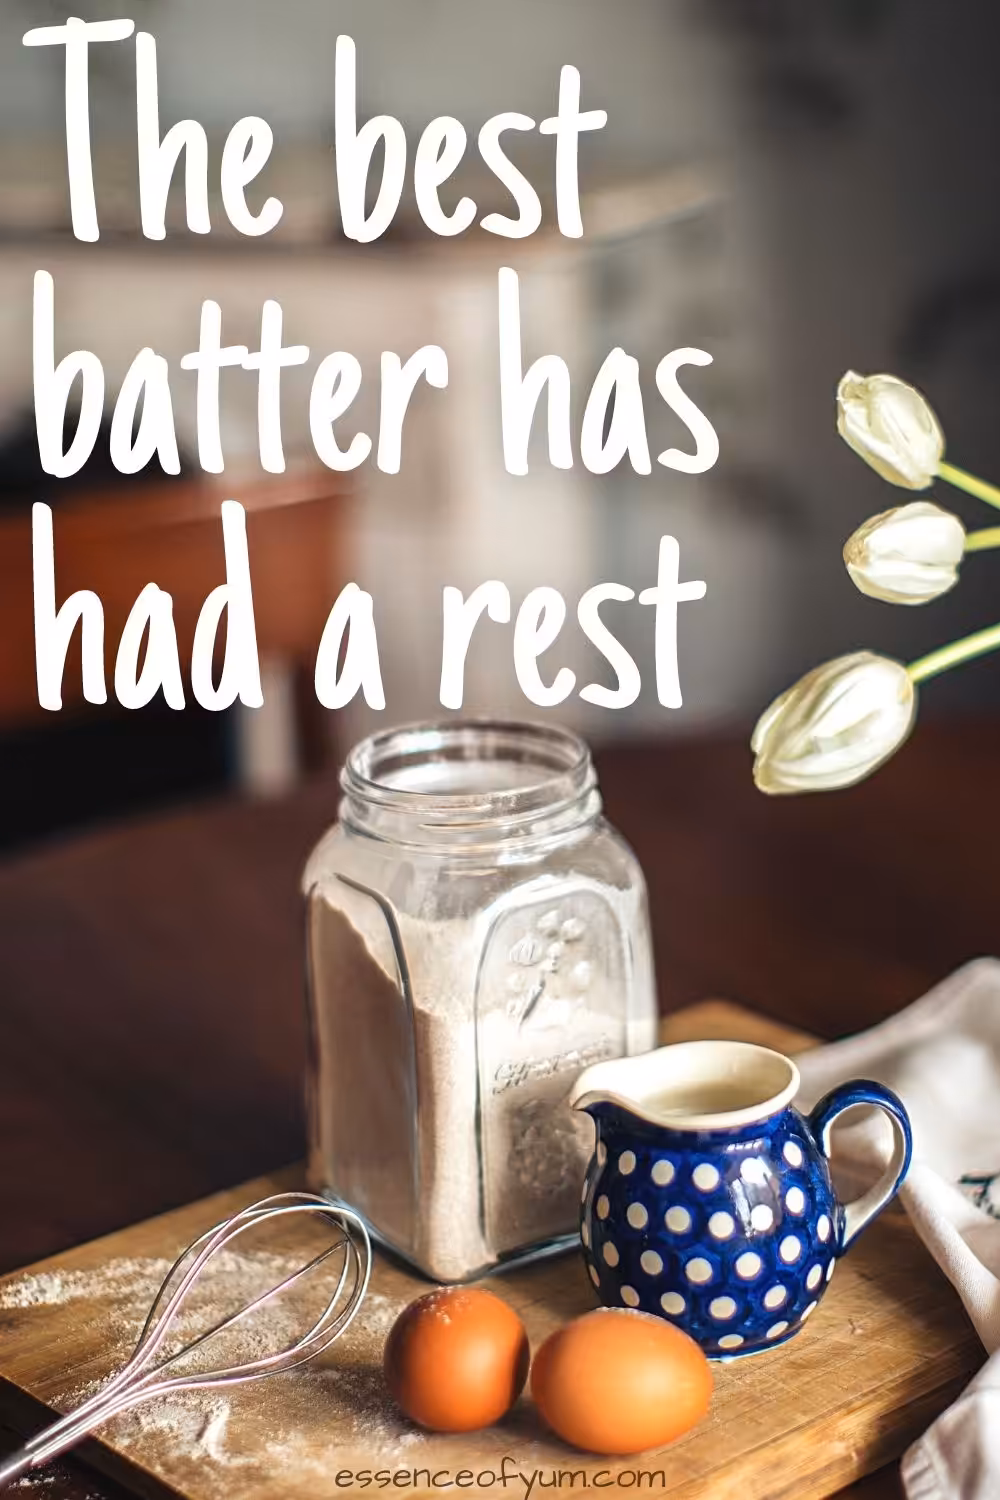
Resting your batter
Almost three-quarters of the recipes recommend resting your batter before using it. This is to allow the starch to absorb as much liquid as it can, which will result in a lighter texture. It also, as Kenji discovered, leads to significantly better rising.
The recommended times vary widely, from as little as ten minutes to as much as three days! Thirty minutes minimum is the most commonly suggested time, although more than a few recommend overnight resting.
In spite of this, several authors believe it’s not necessary, even famous chefs like Jamie Oliver. Again, this is probably related to differing preferences for texture, height, etc.
Batter temperature
A lot of authors don’t comment at all on this. Of those that do, some recommend your batter be at room temperature for better rising, and some recommend it be chilled for a more traditionally cup-shaped pudding. Your call. Or is it?
Batter temperature experiment
A reader, David Peacock, proposed a fascinating question about batter temperature. You can find it in the comments at the bottom of the page, but for reference David asked “as heating the batter quickly is important why not heat the batter before adding to the pan?”
This is a very logical suggestion, and seemed like a great idea to experiment with, so I did exactly that.
The batter
I made a small batch of equal parts batter, then divided it equally into three smaller batches. I left two of them out on the counter and put the third in the fridge for about 45 minutes while I heated the oven to 450°F/230°C.
Batter temperatures
When the oven was good and hot I poured a teaspoon and a half of vegetable oil into each of three muffin tin holes and put it in the oven to heat up. In the meantime I set about heating one batch of the batter.
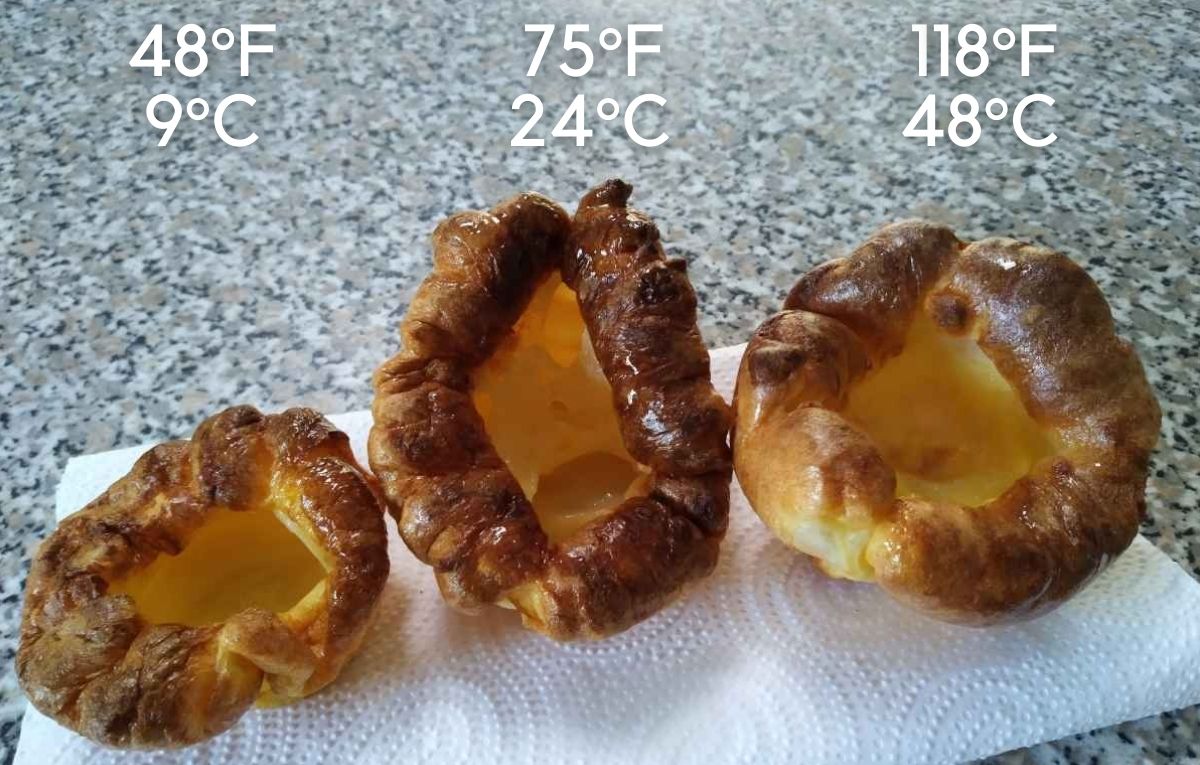
I wanted to get one batch of batter significantly warmer than the room temperature batch, which was now at about 75°F/24°C. But I needed to make sure I didn’t cook the egg in the batter in the process – it needed to remain liquid.
So I started cooking it in the microwave in 30 second stints on the lowest setting (10%). It took several goes, the temperature rising a little each time. I stopped when it reached 118°F/48°C because the egg was starting to cook at the very edge of the mixture.
With the oil in the muffin tin now shimmering with heat, I grabbed the refrigerated batch out and checked the temperature of all three batter batches:
- refrigerated – 48°F/9°C
- room temp – 75°F/24°C
- heated – 118°F/48°C
I then removed the pan from the oven, quickly poured the batters into the preheated oil and popped the pan straight back into the heat.
The results
It turns out David’s suspicion was well-founded. The differences in the rate of rise appeared very quickly.
At just 4 minutes, the heated batter pudding had risen well above the rim of the muffin cup, while the other two had not. A 8 minutes the difference was less pronounced, and by 12 minutes was much less significant. The image below shows the differences (please excuse my filthy oven door).
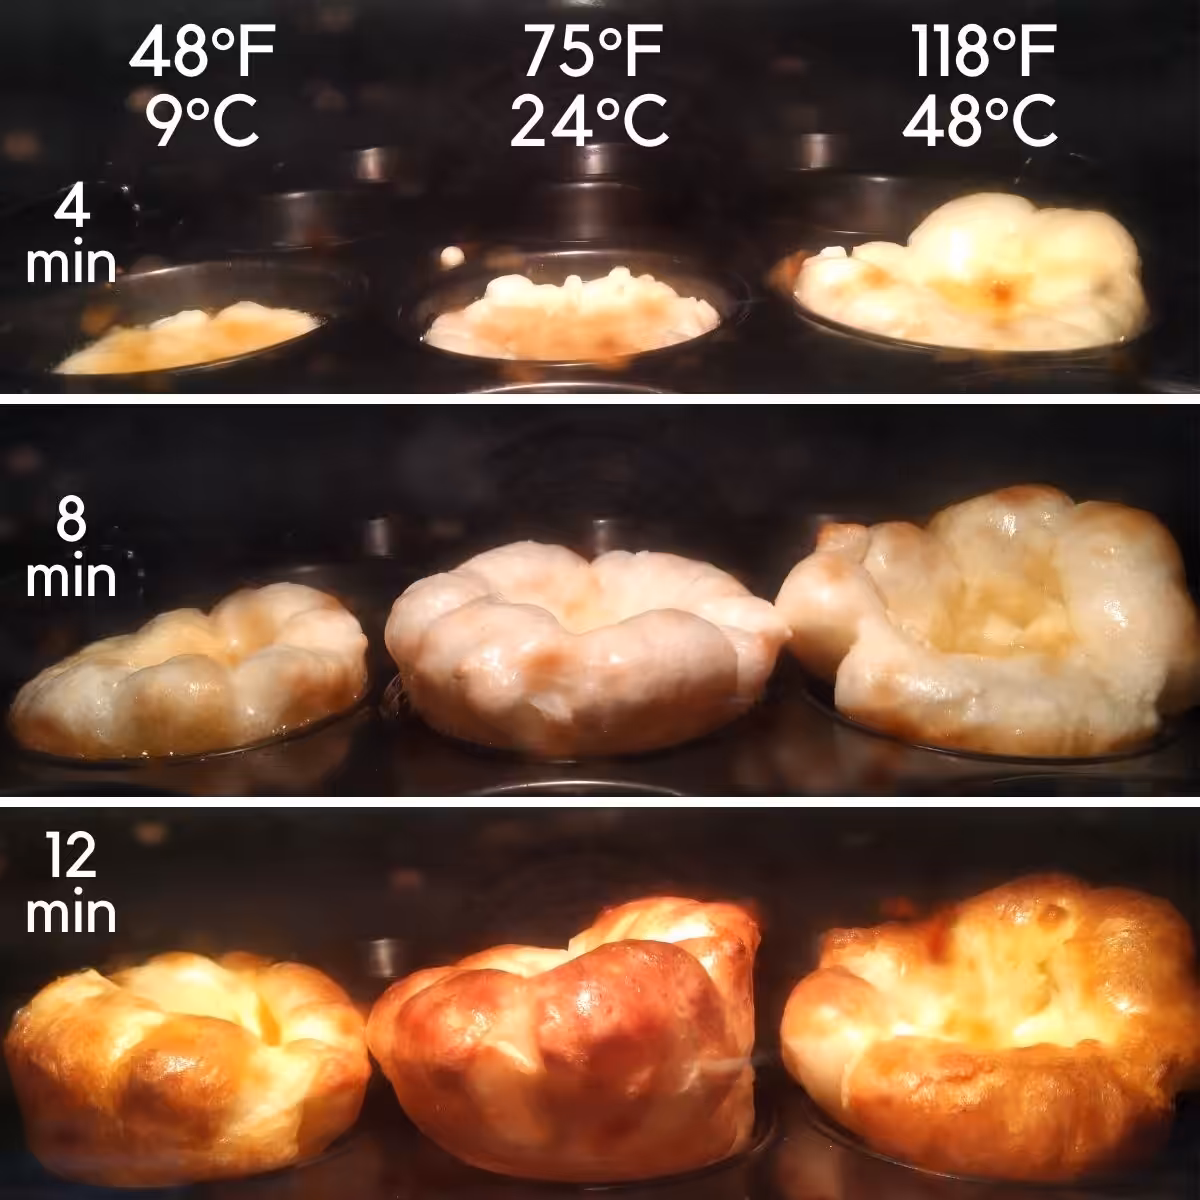
Once they were out of the oven (after about 15 minutes) the differences were still noticeable, although visually there was less difference, especially between the room-temperature and heated batters.
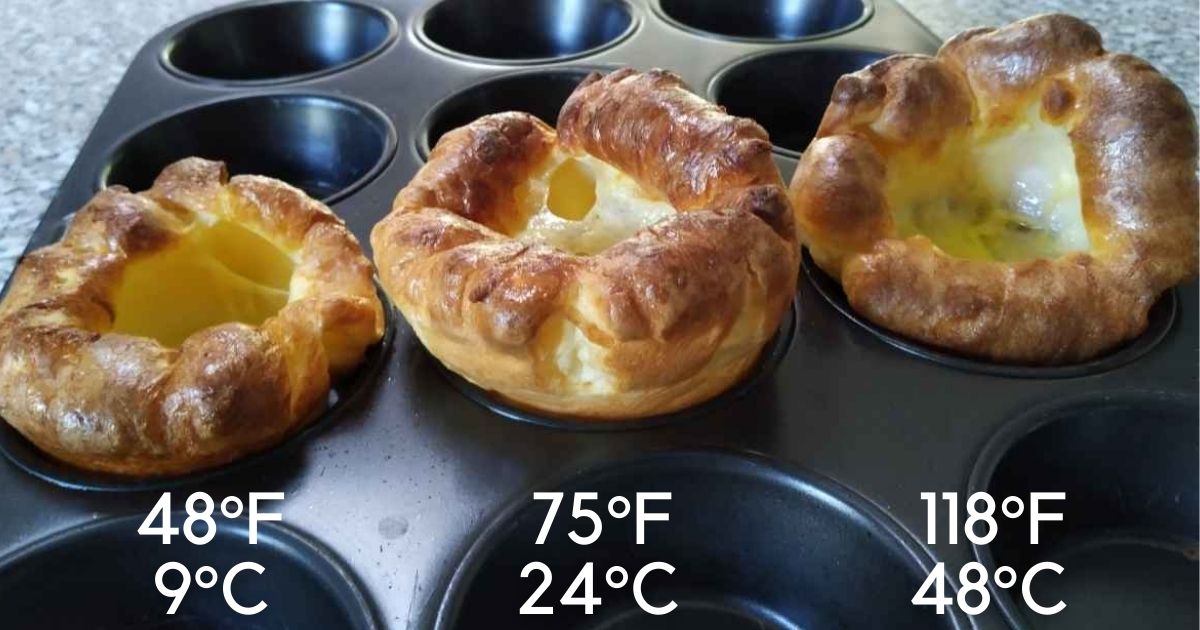
Some authors prefer refrigerated batter for a better cup shape in their puddings, but based on this limited experiment all three batter temperatures produced a nice cup shape. If anything the refrigerated batter pudding was smaller, making for a smaller cup (and less gravy).
What about the taste test?
There were differences in the textures of the three puddings, especially noticeable between the cold and the hot batter.
The pudding from the heated batter was crispier, with thinner walls and a lighter texture. The cooled batter produce a softer, denser pudding which was more fluffy and moist than the heated batter pudding.
My preference of the three was actually the room temperature batter. It produced a pudding that was a great combination of crispy and fluffy.
So is heating your batter worth it?
For me at least, no. The heating process was cumbersome, although I’m sure this could be improved with practice. But the result was not what I love in a Yorkshire pudding. It was a little too crisp and thin. I didn’t have any on hand, but I’m guessing hot gravy might break through this pudding too.
Heating the batter certainly got the pudding off to a better start in the oven though, rising significantly more quickly than chilled or room temperature puddings. So if you’re having trouble getting your puddings to the height you want (or to rise at all), it certainly could be the trick you’re looking for.
Steps to bake a Yorkshire Pudding
The process of baking Yorkshire puddings is a little more involved than something like a cake:
- Preheat your oven to a high temperature, drop a little fat into the bottom of each hole in the muffin tray, and put it in the oven to get the fat nice and hot.
- Pull the tray out of the oven and, working quickly, pour in the batter.
- Put the tray straight back in the oven and bake until done.
Much like making your batter, there’re differences amongst the recipes in almost every one of these steps!
Heating the fat
One of the hallmarks of a Yorkshire pudding is the fact that the batter is poured into hot fat before being put in the oven. And every one of these recipes directs you to do exactly that. This ensures the bottom crisps up almost immediately, preventing it from becoming soggy or undercooked.
What type of fat?
The traditional approach is very clear – it must be drippings from a beef roast. This is where Yorkshire pudding originated and it is still favoured this way today. That said, only half of the recipes recommend you use drippings, and most of these offer alternatives.
In choosing an alternative, you need to consider the smoke point of the fat. Because you’re going to be heating it to a very high temperature, a number of authors recommend you only use fats with a high smoke point.
This generally rules out olive oil, and also whole butter. If you have clarified butter, it will work with it’s higher smoke point, but whole butter may end up burning if you’re not careful. The reason this isn’t an issue with popovers is because many recipes use melted butter mixed into the batter rather than preheating it in the muffin pan.
And as I mentioned earlier, if you’re making popovers, you’re probably going to want to avoid the savoury fats like beef drippings.
How much fat?
The amount of fat in each muffin hole varies quite considerably from recipe to recipe. Some authors recommend as little as half a teaspoon, others just enough to cover the bottom of the hole, and a couple as much as a tablespoon.
In case you’re worried, because the fat is so hot, it’s not going to soak right into the batter, giving you a greasy pudding. The hot fat sears the outside almost immediately, so while the fat will flavour the batter, you don’t need to automatically shy away from the recipes that put more fat in the pan.
Across the twenty recipes the average is a little over a teaspoon per muffin hole. A dessertspoon would probably be about the right measure.
Fat quantity experiment
To test the impact of the amount of fat in the pan, I ran a simple experiment.
I cooked three puddings together in the same pan, at the same temperature, and with the same amount of batter, but I varied the amount of fat in the holes.
For this test I used canola oil, which gets nice and hot without smoking. I pre-heated my oven to 435°F (225°C) and measured canola oil into three of the holes – one with half a teaspoon, one with a teaspoon and one with two teaspoons. I then gave the pan a full five minutes in the hot oven, by which time the surface of the oil was shimmering in the bottom of the holes. I then quickly poured in equal amounts of batter and closed the oven.
I took a series of photos of the puddings as they cooked. Please pardon the quality – I took them through the oven door to ensure I didn’t let any heat out.

As you can see, like the batter temperature experiment, the differences started to appear very quickly. The puddings with more oil started to rise more rapidly, even as early as three minutes. And as time progressed, they also rose more fully.
The larger volume of oil both maintains it’s heat better when mixed with the cool batter, and has more contact with the batter, helping to heat it more quickly.
How hot should the fat be?
Like everything else, there’s quite a bit of variation in the oven temperature used to heat the fat:
- Seven authors recommend 425°F/220°C.
- Six go a bit hotter, to 450°F/230°C.
- Four are a bit cooler, at 400°F/200°C.
- The last three like it really hot – 465°F/240°C.
There’s variation in how long to leave the pan in the oven to heat the oil as well, but the most common suggestion by far is five to ten minutes. A few recommend a bit longer, but unless you’re using a very heavy-based pan I’m guessing this won’t be necessary.
If you’re not sure it’s been long enough, some authors suggest it’s ready when the fat’s just starting to smoke.
Filling the pan
Most of the authors highlight the need to work quickly once you’ve pulled the pan with hot fat or oil out of the oven. If it’s allowed to cool too much your puddings won’t turn out as well. The goal is to fill the pan and get it back into the oven as quickly as possible, all while being careful not to burn yourself with the spitting-hot fat!
Recommendations for how full your muffin cups should be vary from a third to three-quarters full. Any more and you’ll definitely have spillage of fat, batter or both. Based on the averages, halfway-full is about right.
Baking your puddings
Eighteen recipes leave the oven temperature unchanged from that used to heat the fat, so you can bake your Yorkshires at the same temperature. A couple of authors lower the temperature for the puddings and theirs bake a little longer than the others.
There’s quite a bit of variation in suggested baking times, but this is to be expected. The authors’ ovens, their chosen oven temperature, their batters and their finished texture preferences will all be different. And like most things you cook, the best recommendation is “until they’re done”.
The most consistent guide is that your puddings will take somewhere between fifteen and twenty-five minutes. If you’re using one of the higher oven temperatures the time will tend towards the lower end of this range.
And you may want to decide that they’re cooked visually based on the next piece of advice.
No peeking
Many authors strongly advise not opening the oven door while your Yorkshires are cooking, at least for the first fifteen to twenty minutes. They all swear you’ll be dooming your puddings to a failure to rise well.
While it’s understandable, being a well-regarded rule of baking in general, not everyone agrees. In Kenji’s road-test he found this one to be a myth. Still, so long as your oven light works and the glass is clean enough, it can’t hurt to watch without opening the door, can it?
How to know when they’re done
Across the recipes that give some guidance, the key things to look for are:
- They’ve risen well and puffed up.
- They’re golden brown.
Many also advise when they’re crisp, but this is tough to judge without touching them.
Help – my Yorkshire puddings won’t rise!
A number of readers comment on these recipe pages looking for help with puddings that didn’t rise as much as they’d hoped, or much at all.
If you’ve baked before you may be wondering what makes a Yorkshire pudding rise. There’s no leavening agent like yeast or baking powder. So what lifts the top?
The magic ingredient is steam. When the moisture in the batter hits the hot pan some of it turns to steam. As the batter heats up, more of the moisture turns to steam. The steam rises up through the batter, lifting it as it goes.
Because steam is so important, the biggest cause of puddings not rising is a lack of heat.
Timing
My experiments highlighted another factor to be aware of – time.
Even with a lot of oil, your puddings won’t start rising straight away. It takes time for enough steam to build inside the puddings to lift the heavy batter. And with a cooler oven temperature, or less oil, or both, it will take longer.
So you may just need to give them a little more time.
Inaccurate oven temperature
If you’re following all the tips above and your puddings still won’t rise, it may be because of your oven.
Nicky from Kitchen Sanctuary shares her experience with an old oven that didn’t hold a consistent temperature, and gave her inconsistent results. When she installed a new oven, her puddings started turning out beautifully.
Because I come across this issue so often when I’m reading all the recipes for my reviews, I decided to check my own oven. I bought this inexpensive oven thermometer to try. Apart from realising that I really badly needed to clean my oven door glass, I learned that my oven is regularly 5-10°C cooler than it should be after up to an hour of heating time. At the time of writing this my oven was less than a year old, and it’s a highly reputable and well-regarded brand.
Don’t get me wrong, my oven bakes and roasts really well, but I often find I need just a little longer than a recipe recommends, and now I know why (and can plan accordingly). It’s worth trying with your own oven, especially if it’s an older model.
The other potential issue with oven temperature is recovery time. Some ovens, especially older ones, don’t reheat to full temperature quickly after the door’s been opened. If you suspect yours is like this it may be worth heating the oven a little hotter than required and then turning it down to the right temperature after the puddings are in and the door is closed.
How to make perfect Yorkshire puddings
If you’re looking for the sure-fire approach to the perfect Yorkshire pudding, sadly you’re out of luck. Not because it doesn’t exist, but because only you know what you consider perfect!
If you’re looking for a popular approach to a really good pudding, then your best approach should consist of something like this:
- At least half-an-hour before you’re planning to bake, make a batter of flour, milk and eggs. If you’re looking for a rule of thumb, work with equal parts of each, and for a 12-hole muffin tin you want just under three cups of batter.
- When you’re ready to go, preheat your oven to 425-450°F (220-230°C).
- Put a dessertspoon of fat into the bottom of each muffin hole. The best choice here is beef drippings, but any other high smoke point fat will work, like vegetable oil.
- Place the muffin pan into the oven for five to ten minutes to get the fat smoking hot.
- Remove the pan from the oven and quickly (but carefully!) fill each hole about half-way with batter, then put it straight back in the oven.
- Bake your puddings for fifteen to twenty-five minutes, without opening the oven if you can.
- Serve immediately.
If you’re making popovers the ingredients are very similar, except the fat is usually melted butter, and it’s typically mixed into the batter rather than preheated separately in the tin. So you’d skip steps three and four.
So there you have it – the essence of Yorkshire puddings. Hopefully this has helped you understand some of the key aspects of a great pudding, and gives you a lead on the best approach, or recipe, for your perfect Yorkie.
And you know what they’ll go beautifully with? Prime rib roast! And be sure to smother them both in homemade gravy.
Frequently asked questions
How do Yorkshire puddings rise without baking powder?
The rising agent in a Yorkshire pudding is steam. This is why it’s important the fat in the pan is heated first – it helps create steam inside the pudding.
Why don’t my Yorkshire puddings rise?
The most common culprit is not enough heat. To ensure the water in the batter turns into steam, the fat or oil in the pudding cup must be very hot. This means the oven must be hot enough and the fat must be given time to heat until it is almost smoking.
What oven temperature should I use for Yorkshire puddings?
For best results, your oven should be fully preheated to at least 425-450°F (220-230°C).
Recipes included in this review
- Yorkshire Pudding (Soft, Eggy and Fluffy Recipe) – Rasa Malaysia
- Foolproof Yorkshire Pudding Recipe – The New Canadians
- Proper Yorkshire Puddings – Feast Glorious Feast
- Mary Berry’s recipe for quick and easy Yorkshire puddings – HELLO!
- Best Yorkshire Pudding Recipe – Sunday Supper Movement
- Super Cheap 8p Yorkshire Puddings – Skint Chef
- Traditional Yorkshire Pudding – Allrecipes
- How to Make Perfect Yorkshire Puddings That Rise! – Me And B Make Tea
- Yorkshire Pudding Recipe – West Via Midwest
- Pub-style Yorkshire Puddings Recipe – Tesco Real Food
- Ultimate Yorkshire pudding recipe – Sainsbury’s Magazine
- Yorkshire Pudding Perfect With Prime Rib – Just A Pinch Recipes
- Traditional Yorkshire Pudding Recipe – The Kitchen Magpie
- Easy Yorkshire pudding recipe – Jamie Oliver recipes
- PERFECT Yorkshire Pudding – The Daring Gourmet
- The Best Yorkshire Pudding Recipe – Nicky’s Kitchen Sanctuary
- The Best Yorkshire Pudding Recipe – Serious Eats
- How To Make The Best Yorkshire Puddings – Easy Yorkshire Pudding Recipe
- Flawless Yorkshire Puddings – Flawless Food
- How to Make Easy, Classic Yorkshire Pudding – Kitchn
Brilliant article, I love this analysis of lots of different recipes. And yes, I have strong opinions about everything – especially food – great quote of mine to pull!
Thanks for your feedback Chloe, I really appreciate it. And don’t worry, you’re not alone. I have to put my opinions aside as I do these reviews to make sure the article is objective, but it’s not always easy!
As heating the batter quickly is important why not heat the batter before adding to the pan?
That’s a really interesting idea. You’d need to be careful not to overheat it and starting cooking the eggs, but it could definitely result in faster steam production in the oven. I might have to experiment with this…thanks David!
I ran the experiment with batter temperatures and the results were really interesting! Heating the batter definitely makes it rise faster. Full details are in the post above, complete with pictures. Thanks again for the idea David.
my gran and mother cooked the best yorkies in the world. large about 10 inch and used to rise and stay risen to a 6 inch thick pudding. and some times rose so high we had to lift the shelf above remove the pudding very tasty. the new stoves now have fans we find we can;t get the puddings to rise like before and the middle sinks. so fans in ovens are stupid and it would be better if you could turn fans off. your mixtures are all ok, except i always put a large spoonful of cold water in just before putting it in oven. i always had the same success until about 25 years ago when my new oven had a fan which proves fans may be a good thing but no good for proper yorkshire pudding baking. keep up the good work you help people like me cook better.
Thanks Paul.
Your Gran’s and Mum’s Yorkshires sound fantastic. I’ve been meaning to give a big one a go, and I’m even more keen now!
Sorry to hear you’re finding your oven’s fan is causing problems. Fortunately I can turn the fan off in mine and run it in “conventional” mode, which is great for all sorts of baking.
Great article, thank you. I come from an English background and as often as I make these darn things, they don’t always turn out 🤦♀️ But when they do they are magnificent.. my best results have always been room temp & resting several hours. When oil is hot enough, 1 person mans oven door, another pulls the trays (always 2 full trays) and I do the pouring 🤣🤣 it’s a fun, family ritual every time.
My family says “Yorkshire Puddings are Serious Business”
My pleasure Wendy. And that’s a (pardon the pun) well-oiled team process you’ve got there – love it!
Hello Brent.
Made my first-ever yorkies for New Year’s dinner with mixed results: tasty but medium flat; the family loved them though, which was quite nice for a Mexican gathering not used to such delicacies from another country and culture!
Looking for an answer to why they didn’t puff up, my English brother-in-law suggested that Mexico City’s altitude of 2,000 meters may demand the use of baking powder … I take note that in this pastry steam is essential, but what are your thoughts on this? Perhaps yorkies were never meant for high altitudes?
Your article was really illuminating and I will follow your guidance until I reach my goal to serve a full English roast and trimmings at least once a year to honor family ties and student memories from the Grand Island.
Have a great 2023. Cheers!
Hi Miguel, and Happy New Year!
I did some quick research and I couldn’t find any recipes with baking powder in them. I don’t have any experience baking at high altitudes, but it seems like there are three main effects of the lower air pressure:
water boils at a lower temperature, making baked goods rise faster
leavening gases (like carbon dioxide) expand faster, causing holes in the batter
water evaporates faster, making baked goods drier
I don’t think the second or third point are a problem here. Yorkies have holes in them anyway, and they don’t bake long enough to significantly dry out. And interestingly one of the solutions to some of these problems is to reduce baking powder, although that’s for cakes and breads, not Yorkshire puddings.
If your Yorkshires rose well but then collapsed, the first point could be causing problems for you. If your Yorkies are rising really quickly the batter may not be having time to form any structure. Yokrshire puddings don’t really ‘set’ but they do develop some structure that gives them their wonderful texture.
I’m only guessing now, but maybe you could try them at a slightly lower temperature, so that they take a little longer to rise? This might allow the batter to form more structure. Alternatively you could try using the same oven temp but give them a little longer in the oven. Again this may give the batter more time to form some structure, but just make sure you keep a close eye on them – no one wants over-cooked Yorkies!
The only other thought is to try using a little more flour in your batter. This seems to be one of the solutions to baking cakes at high altitude.
I hope this helps. It sounds like you might need to spend an afternoon or two experimenting with different approaches, which means lots of Yorkshire puddings – yum!
Cheers,
Brent.
This is really good article, I’ll try it tonight
Thanks Anna! I’d love to hear how your Yorkies turn out.
I love Yorkies and don’t have a problem getting them to rise, but they always collapse once out of the oven. Any ideas?
Hi Sharon, based on Annette’s comment, I suspect it could be a lack of gluten development causing your problem. Do you allow the batter to rest for 2 or 3 hours before making your Yorkies? If not it’d be worth giving it a try. I’d love to hear if it makes a difference for you!
Cheers,
Brent.
This was a great article Brent. I learned how to make Yorkies from my English grandmother. She always used the same recipe but the two main factors that she attributed to her success were resting the batter and heating the fat. I always believed these to be the hard and fast rules until I read an article a few years ago. I don’t remember where I read it but it was definitely someone who was doing testing like you’ve done. This one said that resting the batter was far more important than heating the fat. From what I understand, resting the batter causes gluten to form which is what causes the height of the Yorkie. I tried it and since then, I haven’t bothered preheating the fat but I make sure to rest the batter at least a few hours at room temperature. It also said that this only works when you are using muffin tins. If you are making it in a big pan, then the fat needs to be heated. I found it interesting that this was the one factor that every recipe agreed upon and nobody ever seems to question. I didn’t try this until after my grandmother had passed but even if she was still here, I wouldn’t dare to challenge her method. I’ve never done side-by-side testing like you’ve done but for my taste, they are perfectly acceptable. Cheers!
Thanks Annette. You’re right that resting the batter allows gluten to form which is what gives baked goods structure, so it makes perfect sense that this is the necessity rather than heating the fat. I’ll have to give it a go next time I make some. Thanks for sharing your grandmother’s tip!
Cheers,
Brent.
I use my blender to mix the ingredients. So after blending on high am I not supposed to reblend before I pour them in the muffin tin 2 hours later?? I thought the idea was to get a lot of air into them.
Hi Brenda,
The main thing causing them to rise is the water in the batter turning into steam, rather than air bubbles created by blending. This is why it’s important the oil is super hot before the batter goes into the pan – so the water is quickly boiled into steam.
If I’ve planned far enough ahead to let my batter rest I usually just give it a gentle stir with a spoon to make sure nothing’s settled out. Not sure if this is necessary for better Yorkshire’s or just my peace of mind.
And as for different heights in the same pan, I find the same thing happens to me. I assume it’s just a combination of slightly different amounts of oil and batter in each hole.
Cheers,
Brent.
also why do some in the same pan rise a lot and some only rise about 1/2 the size of the others.?
I wrote this but not sure what happened. After beating ingredients am I to leave it just sitting on counter to get to room temperature and not beat again. Or beat again just before putting in muffin tin,??
Great article with plenty of theories. Ive always used equal quantities method with mixed results, now I know why that was from reading your modus operandi.Late reply from old mail, but age hasn’t changed methods and ingredients .
Thanks