
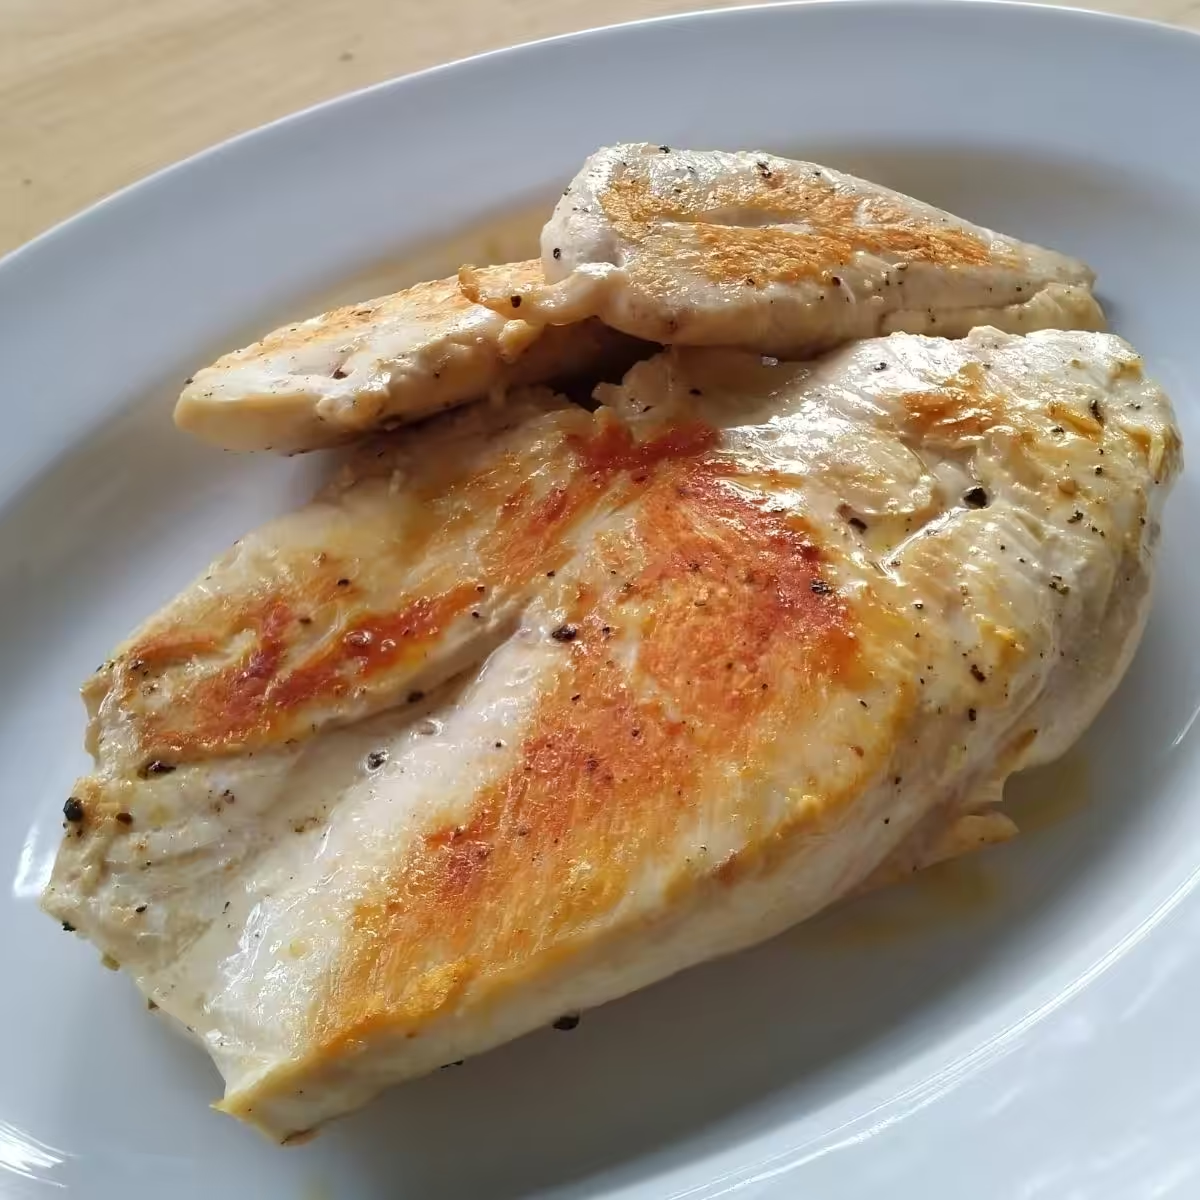
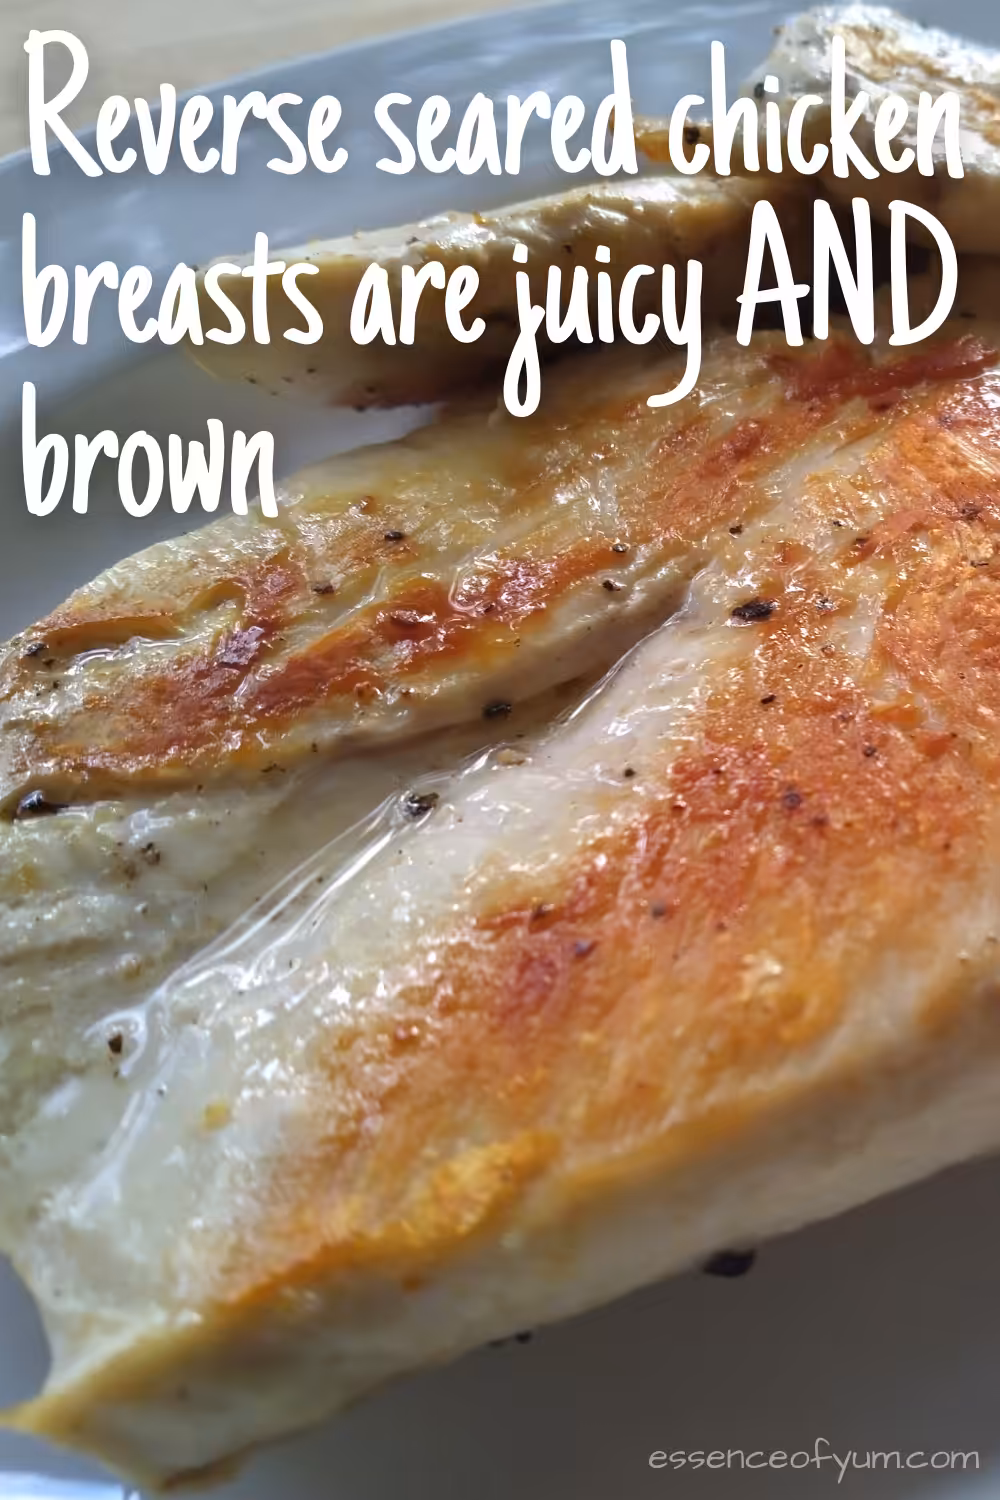
It’s a popular technique with thick steaks, but have you tried to reverse sear chicken breasts? Now you can finally unlock the magic combination of beautifully browned AND juicy chicken breast.
Done right, chicken breast is succulent and juicy, and beautifully brown and crisp. But because it’s so lean, and often quite thick, the “done right” part can be hard to get right. Which is where reverse searing can change the game.
I’ve reviewed ten recipes that reverse sear chicken breasts to get to the bottom of this little-known technique (at least for chicken it is). By understanding how it works for others, I’m hoping my review will convince you to give this great technique a try. I’ve done it, and it’s amazing.
And if you’re wondering why you’d need a new way to cook chicken breasts, read on, because I’ll explain that too.
This post may contain affiliate links. Please read my disclosure policy.
Why reverse sear chicken breast?
The goal of a perfectly cooked chicken breast is two-fold:
- Completely cooked through, but still moist and tender throughout.
- Properly browned to capture the amazing flavour boost that only the Maillard reaction can provide. More on this later.
Sounds straight-forward enough, but it’s more complicated than you might think. Despite the protestations of some Internet trolls, because of the greater risk of salmonella, chicken must always be thoroughly cooked through. And a full breast is a thick cut of meat, so it takes time to heat the interior to a safe temperature. But being very lean, once they’re even a little-overcooked, chicken breasts very quickly become dry and tough.
Because of this complexity, the traditional methods of cooking chicken breast all have shortcomings:
- Pan frying or grilling chicken allows you to develop a beautifully browned exterior, but by the time the middle is cooked through, the outer layers tend to be overcooked and tough.
- The more gentle heat of the oven or indirect grilling allows the meat to heat more evenly, but won’t get hot enough to kick off the Maillard reaction and really brown up the exterior.
- The popular approach of starting in the pan to get a nice brown crust then finishing in the oven seems like a good compromise of these two approaches. But because the outer layers are already cooked when the chicken goes into the oven, this approach tends to overcook these layers.
So how do you get perfectly cooked chicken breasts?
The magic of reverse searing
Reverse searing is the opposite of the third approach mentioned above. When you reverse sear chicken, you start it in the oven, and then finish it in a hot pan. Or if you’re grilling it, you start with indirect heat and finish it over the flames.
The technique has become popular for cooking thick-cut steaks because it allows you to get a more consistent finish to the interior of the steak. With a two inch thick steak (5cm), by the time the middle hits medium-rare, you end up with a layer of medium around it and a layer of medium-well (or worse!) around that. Reverse searing brings the internal temperature up more gently and evenly, then when it’s almost at the right temperature, the steak is seared to a golden crust.
So why not apply this technique to our troublesome chicken breasts?
Reverse seared chicken breasts
While it’s definitely not as popular as it is with thick steaks, reverse searing has been around for some time as a technique for chicken breast.
It’s probably not as popular because it does take more time than either pan frying or oven-baking this midweek staple. And having done it several times now, it does take a little practice to get it right. But if you have the time and are willing to give it a go it can take your chicken breasts to the next level.
I found ten recipes for reverse seared chicken online. Two of these are for chicken thigh, and another’s for a whole spatchcocked chicken, but they’re still worth considering because the principles are exactly the same. Plus once you’ve nailed the technique with breasts, you can then apply it to other cuts of chicken too!
Of the ten recipes, half are cooked in the kitchen (in the oven and then on the stove top), and half are done on the grill (meaning the barbecue for the non-North Americans). Both approaches start with indirect heat and then finish the chicken with direct heat.
Preparing your chicken
Before we jump into the method though, several authors make a couple of recommendations for preparing your chicken for the best possible result.
Even thickness
The first is to make sure that your breasts are an even thickness. While steaks are a fairly consistent thickness, chicken breasts are typically quite a bit fatter at one end, which means they don’t cook evenly. By the time the thick end is cooked through, the thin end is overcooked. There are two ways to address this.
For most breasts, you can pound the thick end with a meat mallet to achieve a more even thickness. This has the added benefit of tenderising the meat as well. Just make sure you cover them with some cling wrap, or pound them in a freezer bag. No one wants chicken juice spraying all over the kitchen.
If the breasts are particularly large, you can cut them through lengthwise into two thinner pieces.
This can be a little fiddly, especially without sharp knives. That doesn’t mean you need a $7,500 chef’s knife though. I use a set of Furi knives that are MUCH more affordable, and they make short work of this sort of task. I’ve had them for years, and with regular honing with a steel and occasional sharpening with a stone, they continue to perform beautifully.
If you do decide to cut your breasts in two, make sure you watch your angle. More than once I’ve ended up with one piece of breast almost the same size as it started, and one wafer thin piece!
Room temperature meat
The other tip that comes up is to give your chicken time to come to room temperature before you begin cooking by sitting it out on the benchtop for twenty or thirty minutes.
I must admit I’ve always been a fan of this approach, because it seems to make perfect sense. Just last night I made a pork roast, and I took it out of the fridge forty-five minutes before putting it in a scorching hot oven, certain I was making a meaningful difference. But as I wrote this review I did some more research, and it turns out there’s a bit of a problem.
As both Kenji on Serious Eats and Meathead on Amazing Ribs found in their experiments, meat takes much longer than we think to come up to room temperature. MUCH longer. A chicken breast is likely to take more than an hour. And my pork roast would probably have needed four or five hours. A dangerously long time from a food safety point of view. Kenji also believes the temperature of the meat doesn’t make a difference, but even if it does, we can’t leave raw chicken sitting out on the bench that long. So I’m not going to bother with this step anymore. To be honest, I forgot half the time anyway!
But there is an important aspect of the temperature of the meat that we must consider before we jump into reverse searing.
Removing doubt with a meat thermometer
I talk about meat thermometers quite often in my posts. If you haven’t used one before, a meat thermometer is a device with a long, slender probe that you insert into meat (or any other food) to measure its internal temperature. They are inexpensive, and indispensable. They’re particularly helpful for big pieces of meat, like a baked ham, or for making sure your prime rib is medium rare inside.
But it’s not just big cuts of meat. You can improve your chicken breast game with a meat thermometer. And to really effectively reverse sear chicken, having one is almost mandatory. You need to be able to closely monitor what’s going on inside your chicken breast.
For smaller pieces of meat that you’re cooking several of at once, like chicken breasts, you want an instant-read thermometer. These are capable of very quickly measuring the temperature of the meat once the probe is inserted.
I use this digital fast-reading meat thermometer, and it works brilliantly, giving me a precise internal temperature in about four or five seconds. Simply open the oven, slide the oven rack out, and pop the thermometer probe into the thickest part of the breast. You’ll know if you need to keep cooking, how much more it needs, and after two or three measurements you’ll get a sense of how quickly the temperature is rising too.
How to reverse sear chicken breasts
To get the best results with chicken breast, we need to consider cooking them as two separate tasks. First, we cook the inside, then we sear the outside.
Step 1: Cooking the inside with indirect heat
Every one of these recipes starts the chicken in the oven or in an indirect heat setup on the grill. The latter usually involves only placing coals or only lighting burners under one side of the grill, and placing the chicken on the other side.
All of the authors provide a cooking temperature, a target internal temperature or both. And, as always, there’s a bit of a range.
Oven or indirect grill temperature
Of the eight recipes that provide a cooking temperature for your oven or grill, half recommend 275-300°F (140-150°C). One of the others uses a lower temperature than this and the other three are higher.
It’s interesting to note that two of the oven recipes recommend 375°F/190°C. This is significantly hotter than the others, and to some degree undermines the goal of first cooking the chicken gently to ensure it’s evenly heated all the way through. It clearly works for these authors, but is certainly not the most popular approach.
Covering your chicken
A couple of authors have you cover your chicken with foil, or even enclose it in a foil pouch.
I’ve reverse seared chicken breasts a number of times now, and I’ve always had better results when I cover the breasts in the oven. This makes sense because it cooks the chicken more evenly. Without foil I find the outside is cooked just a little too much before going in the pan.
When I do cover my chicken I use the pouch approach simply because it’s easier to clean up.
Target internal temperature
All but one of the recipes recommend an internal temperature at which you should remove your chicken from the oven or move it to the direct part of the grill.
The most popular recommendation, favoured by six authors, is 140-150°F (63-66°C). The other three aim for 160-165°F (71-74°C).
There are a few important things to remember here:
- We’re still going to cook the chicken again, albeit not for very long, but on a high heat.
- Chicken is safe to eat at 165°F/74°C.
- A key to achieving our goal is not overcooking the meat.
So considering these three points, it’s clear why the lower temperature recommendation is more popular. If you pull your chicken out of the oven at 165°F, then pan fry it in a hot pan, it’s going to be overcooked. If it’s not in the pan long it could still be good, but it won’t be at it’s very best. Better to stop about 15-20°F short to allow for the second cooking phase.
How long to oven-bake/barbecue?
Most of the authors provide rough timings, but they vary based on the cooking temperature, the cut of chicken used and the target temperature. The suggested times vary from twenty to forty-five minutes. Given that we’re targeting an internal temperature, the best advice here is to start checking with a meat thermometer at twenty minutes. Like roasting a turkey, the denser meat of thighs will take longer, as will bone-in cuts of any type.
I do mine at 300°F (150°C) and find it takes thirty to forty minutes depending on the thickness of the breasts.
Step 2: Searing the outside with direct heat
After bringing the internal temperature up to a little less than we want the finished product to be, the next step is to sear the outside to a beautiful brown. The goal of the first step was to be gentle with the heat. This time it’s the opposite.
Browning food with the Maillard reaction
Earlier I mentioned the Maillard reaction. This is the chemical magic that happens to proteins and sugars at high temperatures. Once the reaction begins, it creates new molecules, which are responsible for the delicious aromas and amazing flavours we associate with well-cooked meat.
The Maillard reaction kicks into gear properly when the surface of the food reaches about 300°F/150°C. And the important point here is the surface of the food.
While the oven may be at this temperature, the surface of the chicken will not have been that hot after only twenty or thirty minutes. The inefficiency of indirect heat, the cooling effect of moisture in the meat, the transfer of heat within the meat and more all prevent the Maillard reaction from fully kicking off in the oven. Hence the need for direct heat.
Drying your chicken
One of the enemies of the Maillard reaction is water. If the surface of the food is damp, the water prevents the temperature from passing 212°F/100°C until all the water has evaporated. For this reason, the two authors who don’t use a marinade direct you to pat your chicken breasts dry when they come out of the oven. This will help Maillard browning kick in more quickly in the pan.
The reason only a couple do this is because the other recipes avoid the issue in other ways:
- Several use marinades with oil in them. The hot oil will help the pan quickly raise the surface temperature of the meat.
- The recipes done on the grill will naturally dry out during the indirect cooking phase because the hot air can circulate right around the meat. This doesn’t happen with those in the oven because three authors cover them and the other two sit in marinades.
As I mentioned above, I find that I get better results when I cover the chicken in the oven. I’ve also found that if you do cover it, patting it dry with a bit of paper towel really is important to get best results with the next step.
Searing your chicken hot and fast
The goal of this phase is to get a nice brown crust on the chicken. You also need to bring the internal temperature up to almost 165°F/74°C, but no more.
Whether you’re using a pan or the grill, most of the authors emphasise the importance of getting it hot. On the stove you want a cast iron or stainless steel pan that’s been well heated over medium-high heat for at least five minutes. And on the grill you want to have stoked the direct side up nice and hot.
Most of the authors provide rough times for browning your chicken. Like the first step though, the times vary with the cut of meat the author uses, how hot the pan is and so on. On average though the suggested time required is about two to three minutes per side. It’s worth noting that the three skin-on cuts used (thigh and a whole chicken) only sear the skin side.
Again you want to watch your chicken’s internal temperature here. Keep in mind that it will continue to rise a little after it comes off the heat. For this reason, a number of the authors recommend stopping when the temperature reaches 160°F/71°C. The chicken will then reach safe temperature as it rests after cooking.
Resting your chicken
Most of the recipes recommend resting your chicken for five to ten minutes after cooking. This allows the juices to redistribute within the meat after the hot sear. A few don’t see this as necessary, but in my experience cooked meat always benefits from a brief rest. The majority of these authors seem to agree.
Flavouring your chicken
While it’s not the focus of this review, it’s worth mentioning the different techniques the authors use to flavour their chicken.
- Six authors marinade their chicken in a variety of different styles and flavours.
- Two of the grill recipes use a dry rub on the chicken.
- Ninette at Big Bold Beautiful Food applies a flour, cornstarch and butter slurry to the breasts before they go into the pan. The goal of this approach is to create a bit of a crust on the skinless breasts.
- Becky from The Cookie Rookie only applies salt and pepper to her chicken, plus a little butter before searing.
Using either of the two first techniques you could apply just about any flavour you like to your chicken. Alternatively, chicken done more simply (like the last two above) could be added to a stove top sauce, or a salad.
I’ve used the flour and cornstarch approach, and added in other spices, producing a beautiful crust and great flavours. Be careful with the butter though. It has quite a low smoke point, making it easy to burn if your pan is really hot.
The essence of reverse seared chicken breasts
If you want your chicken breasts to be both beautifully moist and deliciously browned, you need to give reverse searing a try. It takes a bit longer than some traditional methods, but is straightforward and easy to master:
- Bake your chicken breasts at 275-300°F (140-150°C) until they reach an internal temperature of 140-150°F (63-66°C). To make sure they don’t overcook, start checking the temperature after twenty minutes.
- Sear them in a hot pan until they reach an internal temperature of 160°F/71°C. This will likely take about two to three minutes per side.
- Rest your chicken breasts for five minutes or so. This will allow the juices to redistribute and the temperature to come up to the target of 165°F/74°C.
For best results, make sure your chicken breasts are a fairly even thickness. You can do this by pounding them out a bit, or cutting really thick ones lengthwise into two skinnier pieces.
And if you prefer to use the grill, the same guidelines apply. Start your chicken on indirect heat, then move it over the coals or flames for step two.
So there you have it – the essence of reverse searing chicken breasts. Hopefully this has made you curious to give it a try, and armed you with the knowledge to pick one of these recipes, or just jump into it on your own.

Recipes included in this review
Oven & stove top recipes
- Cook’s Illustrated Pan-Seared Chicken Breast Technique – Big, Bold, Beautiful Food
- PERFECTLY MOIST BONELESS SKINLESS CHICKEN BREASTS – Eats by the Beach
- Reverse Seared Tequila Lime Chicken Breasts | Keto, Low-Carb – A Girl Called Adri
- Honey-Soy Braised Chicken Thighs with Reverse-Sear Technique – Kikkoman USA
- Juicy Pan Seared Chicken Breasts – The Cookie Rookie